Under the Hood: In-browser Image Capture with Shutterbug
A new suite of our online STEM activities includes challenging web-based interactives that model physical phenomena—from diffusion to protein folding and pendulum motion to climate change. Students run the model, testing different variables, then answer questions about the model’s behavior by taking and annotating snapshots.
Because we couldn’t find any open-source web technology for image-based questions and answers—and we didn’t want to install special software on a student’s laptop or tablet—we created Shutterbug, a versatile open-source JavaScript and Ruby project that captures screenshots in a variety of web applications.
Technical overview
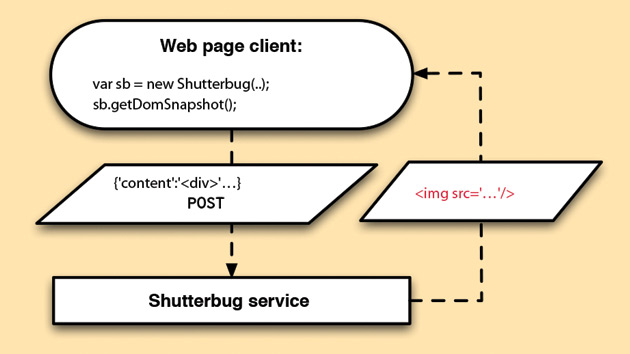
Shutterbug is distributed as a Ruby Gem. It’s a Rack service that can deliver its JavaScript to the browser. The JavaScript library sends HTML fragments back to the service, which generates images from these fragments using PhantomJS. In Figure 1, getDomSnapshot() triggers a request to the Shutterbug service. The response from the POST request contains an image tag that points to a newly created image on the server.

Getting started
With three simple steps you can download and test Shutterbug locally. First, you’ll need to have Ruby and a recent version of the Bundler Gem installed.
- Download Shutterbug from github, or clone it using git.
- Install bundler. Run bundle install from your shell.
- Start a rack server bundle exec rackup
That’s it! Now, you can browse the demos running on your local machine at http://localhost:9292/index.html.
Integration
If you’d like to integrate Shutterbug into your project and host Shutterbug on your own server, start by downloading it. (The project’s README also includes step-by-step instructions for setting up a free Heroku Shutterbug service.)
Once you have a Shutterbug server setup, integrating it into a web page is simple— just include the following somewhere in your page’s markup:
<script src=’http://<yourhost:port>/ shutterbug/shutterbug.js’ type=’text/javascript’></script>
You’ll have to replace <yourhost:port> with the actual address of your server. In your page’s JavaScript, create a new Shutterbug object like this:
var shutterbug = new Shutterbug( '#sourceselector’, '#outselector' );
Elsewhere in your JavaScript, bind some event to call getDomSnapshot():
$('#button').click(function() { shutterbug.getDomSnapshot(); });
The Shutterbug constructor new Shutterbug(…) takes a few arguments to tell Shutterbug what DOM element to snapshot, and what to do with the resulting image tag. In this case $(“#sourceselector”) identifies an HTML tag as the source we want to capture. We also tell Shutterbug to update $(“#outselector”) with an <img src=”http://<yourhost:port>/ get_png/sha1hash> tag that will be returned by Shutterbug.
You can even specify custom callbacks or have multiple Shutterbug instances work together across iframes.
Shutterbug is a new project, and we welcome help and feedback. Please join our mailing list.
Noah Paessel (npaessel@concord.org) is a senior web developer.
